Overview
Quicken Invoice and Bill reminders help you plan your expenses and expected income. When you create an invoice or bill reminder, you enter the details of the invoice or bill and tell Quicken when to make the next payment, the amount due, and how often to make future payments. This applies to money coming in from customer/vendor invoices as well.
Scheduling Recurring Invoices
1. Open the register of the account you want to schedule the transaction for.
2. In the bottom of the register, click on the Bill and Income Reminders tab to expand it.

How can we help?
✖Still need help? Contact Us
3. Click the Add dropdown button and select Invoice Reminder.
4. In the Vendor/Customer field, type or select the customer and click Next.
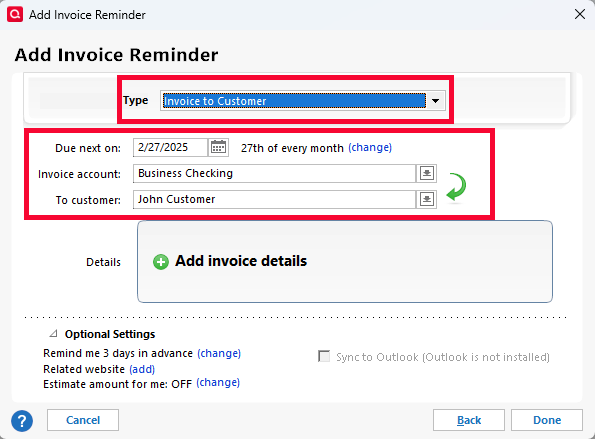
5. Click the Type dropdown and choose whether the invoice is an invoice to customer or vendor, or a payment.
6. In the Due next on field, enter the due date for the invoice. Note: You can click the blue change link to the right to change when and how often the invoice goes out.
7. Verify the Invoice account and To customer fields.

How can we help?
✖Still need help? Contact Us
8. Click on + Add invoice details and enter the invoice information into the window.

How can we help?
✖Still need help? Contact Us
9. When finished, click Save and Done.
10. Under Optional Settings in the Add Invoice Reminder window, you can choose a reminder timeframe, add a related website, or estimate variable payments. You can also choose to Sync to Outlook if Microsoft Outlook is installed on your computer.

How can we help?
✖Still need help? Contact Us
11. When finished, click Done to set up the scheduled invoice.
Note: Transactions scheduled later than today are not entered in your register until the specified time. You can view the scheduled transactions for all accounts in the Bill and Income Reminders (choose Tools menu > Bill and Income Reminders).
Scheduling Recurring Manual Bill Reminders
1. Open the register of the account you want to schedule the transaction for.
2. In the bottom of the register, click on the Bill and Income Reminders tab to expand it.

How can we help?
✖Still need help? Contact Us
3. Click the Add dropdown button and select Manual Bill.
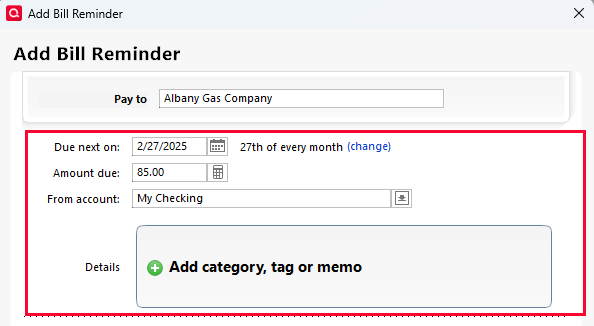
4. In the Pay to field, type or select the payee and click Next.
5. In the Due next on field, enter the due date for the invoice. Note: You can click the blue change link to the right to change when and how often the invoice goes out.
6. Enter the Amount due, and then verify the account in the From account dropdown.
7. You can click on + Add category, tag or memo to add a category, tag, or memo to the reminder. (Optional)

How can we help?
✖Still need help? Contact Us
8. Under Optional Settings in the Add Bill Reminder window, you can choose a reminder timeframe, add a related website, or estimate variable payments. Additionally, you can choose to Sync to Outlook if Microsoft Outlook is installed on your computer or print a check.

How can we help?
✖Still need help? Contact Us
9. When finished, click Done to set up the scheduled reminder.
Note: Transactions scheduled later than today are not entered in your register until the specified time. You can view the scheduled transactions for all accounts in the Bill and Income Reminders (choose Tools menu > Bill and Income Reminders). If you told Quicken to remind you to enter a scheduled transaction when it's due, when the time comes to enter the scheduled transaction into the register, Quicken places a reminder about the scheduled transaction on the Scheduled Transactions tab at the bottom of the appropriate register.
