Quicken Mac Tips
Quicken is a powerful personal finance tool with a wealth of features. There are so many features that it is easy to miss many of the things you can do. To help you find new ways to use and improve your Quicken experience, we’ve assembled a number of tips. You’ll find tips here for both beginners and power users. The more you know, the better your Quicken experience will be.
Try EasyAnswer reports
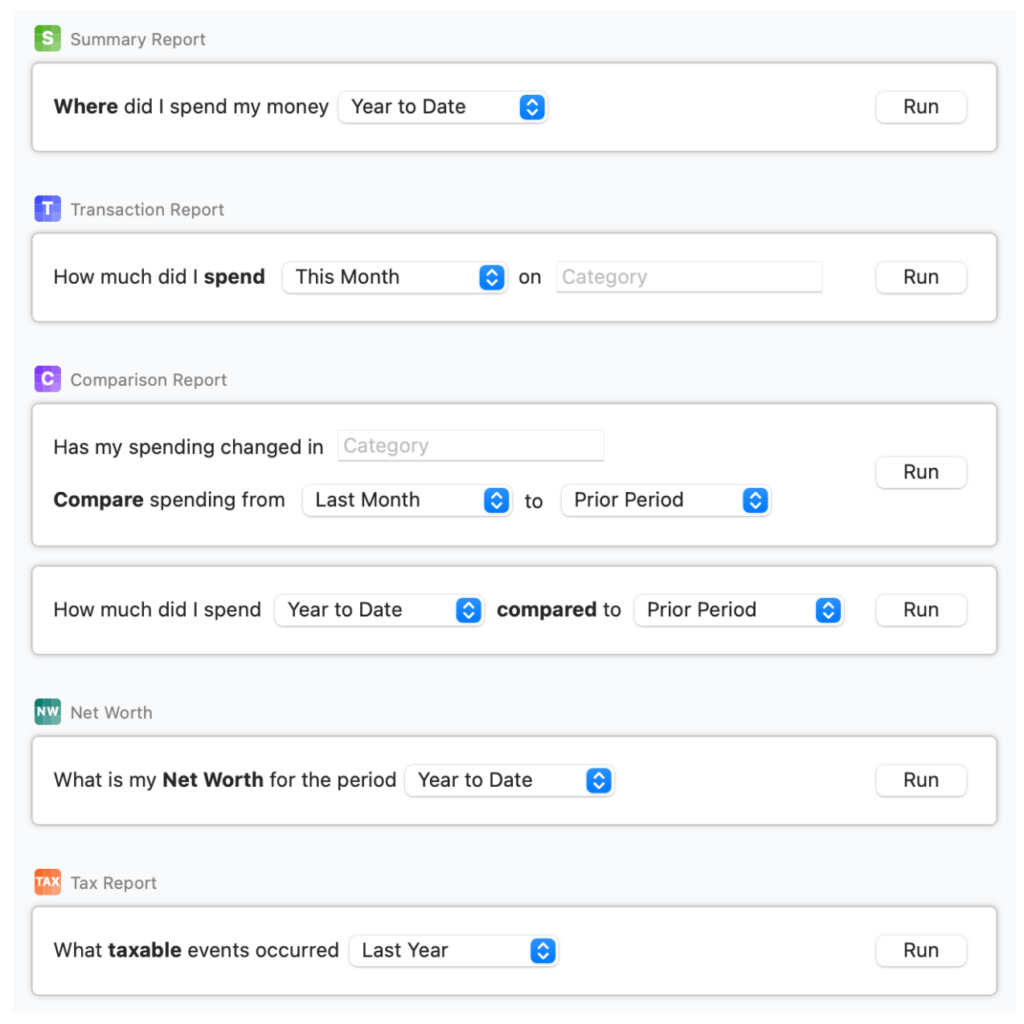
Discover the convenience of EasyAnswer reports and gain a better understanding of your finances. Head to the Reports tab and select EasyAnswer from the left column to access our list of reports. EasyAnswer reports are designed to answer specific questions such as where you spent your money, how much you spent, how your spending changed, how much you spent compared to other time periods, your net worth for the period, and any taxable events — all with a single click.
Portfolio Chart power-user tips
Your Portfolio Chart in Quicken has many great features you may not be aware of. These are some of the things you can do:
- Click the chart to lock or unlock the value and date popover. When locked, the value and date won’t change as you move to different spots on the chart.
- Use the secondary click to show or hide the value and date popover.
- Click and drag across the chart to get information on a specific date range.
- Use Option + click to turn the crosshairs on and off.
Hide cents when viewing the investment portfolio
Do you ever feel like your investments are just small change? Some people don’t like to see how many cents a stock is worth — they just want to see the dollars. If you’d prefer to hide cents, go to the three-dot menu in your investment portfolio and select Hide cents in amount. Your individual investment totals will be rounded to the nearest dollar. Your account total, however, will continue to show your full Market Value, including cents.
You can customize how reports look
You can take control over the appearance of your reports with the View Settings menu. On the menu bar of a report, go to View and select View Settings. You can update the font, text size, and row style on the Report View Settings screen. Additionally, you can turn on or off the Options for Show Currency Symbol and Show Cents.
Get access to more brokerages with Simple Tracking
Quicken for Mac’s Simple Tracking feature gives you access to a wider range of brokerages. Simple Tracking is a feature that reports on positions and total value for investments without also tracking transactions. This option not only provides a cleaner user experience but also makes it possible to work with hundreds of brokerages that were previously unavailable, including such popular investment companies as Robinhood and WealthBuilder. Meanwhile, if an investment company does offer Complete Tracking, you have the option of choosing which sort of tracking you prefer. As always, you can add new brokerage accounts by clicking the add account button ![]() and selecting Investments → Brokerage.
and selecting Investments → Brokerage.
You can hide accounts you track but don’t want to see every day
Quicken gives you the ability to hide accounts. Hiding an account allows you to continually track the account but not have it clutter up your sidebar. For less-used accounts, or if you track many accounts, hiding an account can be handy.
To hide an account, go to the Accounts menu and choose Hide and Show Accounts. From there, choose the Hide in Lists checkbox next to the account(s) you want to hide. This will hide the account in the Quicken sidebar and transaction lists, such as when creating a transfer. However, all data from the hidden account will still be available by default in the budget, reports, net worth, and other features.
If you’d like to exclude all an account’s transactions from reports and features by default, choose the Keep Separate option. Keep Separate is helpful if you manage an account for a relative, club, etc.
What does the Q do?
Did you know that the Q icon in the upper right corner of your Quicken screen is more than just an icon? If you click the Q, you can see the name of your file and show it in the Finder. You can also access your Quicken Account, contact support, share your screen, and check for updates!
Have you added your student loans?
If you have student loans, it’s important to know how much you owe. Quicken works with many student loan providers so you can download and track your loan information automatically. Providers on Quicken include Navient, American Education Services (AES), CornerStone, PHEAA, SoFi, MOHELA, and many others. To add a student loan provider, follow the same process for adding accounts and choose the provider you work with. Be aware that while you can track the balance of your connected loans, the many payoff options for student loans mean you cannot track amortization or some of the other features available for mortgages and other loans.
Use right-click to quickly find transactions from the same payee
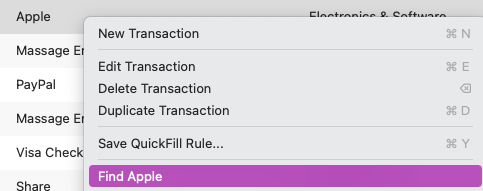
When you’re in the register looking at a transaction from a payee, you may want to see the other transactions from the same payee. If you do, simply right-click on the transaction and select the Find feature. For example, if you see a charge from Apple, right-click on the transaction and you’ll see the option Find Apple. After selecting Find Apple, you would then see all of your Apple transactions in the register.
Quickly update your portfolio value

Did you know that you can use the refresh feature on the investment toolbar to update the prices for your securities quickly? The toolbar displays the date and time of your last update. Click the refresh button next to the date and time to get the latest prices for your securities.
When you use the Quicken Dashboard, you may notice that you can now see when your transactions were last updated listed at the top of the dashboard. Next to that, you’ll see the Update now feature. Clicking Update now will activate One Step Update, which is also available on the accounts toolbar. Use Update now as a convenient way to update your transactions and see your latest transaction information.
Do you know how to close an account?
Sometimes you close out an account with your bank or credit card company, but still want to keep the transaction history for your records. The easiest way to do this is to close your account in Quicken. To close your account, right-click the account on the sidebar and select Mark [account] as closed. Quicken will ask you to verify this step and let you know what adjustments will be made to your account. Review all the information before making a final decision to close your account.
Did you know you can specify which accounts to sync with mobile & web?
While you can track many financial accounts in Quicken, you may not want to see all of those accounts when you are using the companion software, Quicken Mobile and Quicken on the Web. You can easily designate which accounts to sync by going to Quicken menu → Preferences → Mobile, Web & Alerts. Under Accounts, you will see a list of your financial accounts. You can use the checkbox next to an account to enable or disable that account for synchronization.
Three things you should do in Quicken for Mac at the end of the year
One: Back up your file
It’s a good idea to back up your transactions at the end of the year. This ensures that you will have a backup copy that includes that year’s finances.
To begin the process go to File menu → Save a Backup. You might want to save your backup to Dropbox or your iCloud Drive. You should also go to Quicken menu → Preferences → General and make sure you have automatic backups turned on.
Two: Run year-end reports
Run reports to see your past year’s finances. Almost all reports are useful from a year-end perspective, but here are five great reports to run:
Tax Schedule: A report on your taxes focused on the individual tax forms each transaction may apply to.
Cash Flow: An overall view of your income and expenses by category.
Transactions by Account: A complete list of all your transactions. You may also wish to run Transactions by Category and Transactions by Payee.
Spending Over Time: A month-by-month look at your spending.
Category Comparison by Year: This report will help you compare your spending to previous years by comparing spending categories. You may also be interested in Payee Comparison by Year.
Three: Review your budget and categories
The end of the year is a great time to review your budget and the categories in it. Look for areas where you overspent or underspent. Also, check to be sure your transactions are properly categorized. You may find that some transactions are better tracked by a different category once you take the time to give them a second look.
You can filter your categories
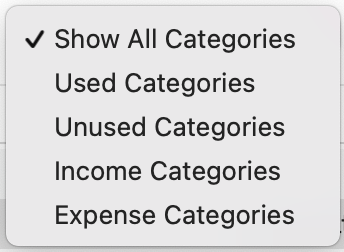
When you access your Category List (⇧⌘C) you can quickly filter the list to narrow your choices. The filter includes:
- Show All Categories
- Used Categories
- Unused Categories
- Income Categories
- Expense Categories
You can also just start typing a name in the Search field if you know what you are looking for.
See all your securities in one place
Did you know that if you use Quicken’s investing features, you can quickly bring up a list of your securities? You can access your Security List by going to Window menu → Securities or pressing Shift+Command+R. From the list, you can see what securities you are tracking, edit or delete those securities, and add new securities.
Click security names to see more information
A quick way to get more information or edit a security is by clicking on the security name in the Portfolio View or in the Investment Dashboard for the Holdings and Top Mover cards. This brings up a menu that allows you to Edit a Security or see an overview (a web page that has news and information).
Get more information about your last account update
Do you want to see what was updated the last time you updated your accounts? Go to Window menu → Account Status. You’ll see what accounts were updated, how many new transactions (if any) were downloaded, and the date and time of the last update. You can also use the Account Status window to update individual accounts.
What do the dots next to your account names mean?
You may notice different colored dots next to your account names on the sidebar. These dots let you know the status of that account. A blue dot means there were new transactions added at the last update. An orange dot means there is an issue with that account. You can find out what the issue is by selecting the orange dot. You will then see the Account Status window. You may also see an alert at the top of the Quicken screen
Get your projected balance
Did you know Quicken can forecast what your bank balance will be? Go to Bills & Income, then select Projected Balances. You can look at the projected balance for all of your accounts or choose a single account. You can also choose from different date ranges. Your calendar will also show balance projections.
Cash Accounts
Do you want to keep track of the cash you spend? You can start a cash account and track it manually. To create a cash account go to Accounts > New > Cash. Set your opening balance and select Finish.
Access your Tags
Did you know you can easily access all of your Tags? You can use Shift + Command + T or go to Window menu → Tags to see a list of all your Tags. You can use the Tags screen to view your current tags. You can also use + to add new tags. The Tags screen also has a search feature, which is handy if you use a lot of tags.
Remind yourself when income is coming
Did you know you can schedule a reminder to let you know when your paycheck or other income is coming? This is a great way to help you get more information about your cash flow. To schedule a reminder, find a paycheck or other regularly occurring income in your register and use Control + Click to see a menu of actions. Select Schedule Selected Transaction. The Add a New Bill screen will appear. Select Next under Other Bill or Income, then follow the on-screen instructions to enter your income reminder.
Edit multiple transactions
Did you know you can edit multiple transactions at once? This is a great shortcut when you need to change the Payee, Category, Tag, Memo, or other information for multiple transactions. Just select all the register transactions you want to edit, and press Command + I.
See transaction details
Do you want to see the details of a transaction? If you have selected a transaction, you can use Option + Command + E to see the details for that transaction. This includes information such as the Memo, Tags, Splits, and Attachments. You can edit these details and make any necessary changes to your transaction.
Check for product updates
If you want to check to see if you are on the latest version of Quicken for Mac, in the main menu select Quicken → Check for updates. It will let you know if you are on the most current software version. If you aren’t on the latest version, you can update right from that screen.
Dive deeper into a transaction with the Transactions Inspector
Your register is a great way to look at transactions at a glance, but what if you want to see all of the information Quicken has about a transaction? In that case, you can use the Transactions Inspector. From any transaction, press Option + Command + I. This will toggle the Transactions Inspector, which provides all of the available details about a transaction. This includes all the basic information such as the Amount, Date, and Payee. It can also include, if available, deeper information such as identification numbers, Date Posted, and the Statement Memo. This is information you don’t always need but can be vital in situations such as payment disputes.
Did you know Quicken can calculate amounts for you?
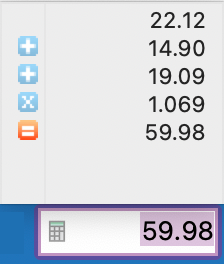
Do you need to do some quick math? You can do it without leaving the Quicken for Mac application. Whenever you need to enter an amount, you can calculate it right in the amount field using common math symbols such as + – * / =. You can use this to add a series of numbers from a receipt, calculate sales tax, or otherwise split an expense or income. To do this, click in the Amount field where you will be entering your number. You’ll see a little calculator icon  . Click the icon and begin entering your equation. Press = to get your total or press Return to send the total straight to the Amount field.
Do you know how to sync to your mobile accounts?
You can sync your Quicken for Mac account with your Quicken Mobile account without having to perform a full update of all your accounts. To do this select Accounts → Sync to Mobile. You can also use the keyboard shortcut Ctrl + S.
Do you know about the Activity tab For Bills & Income?
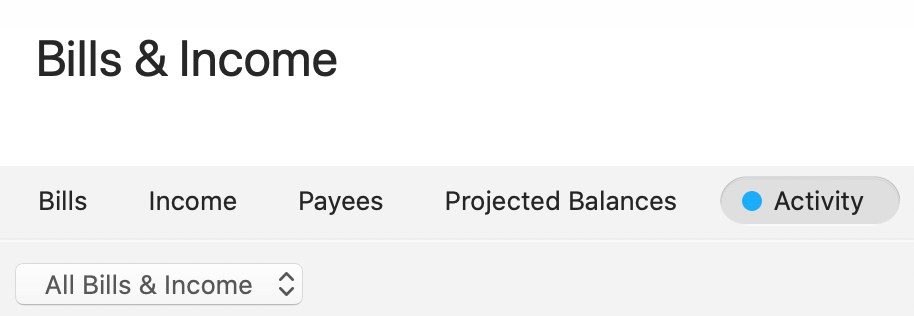
The Activity tab for Bills & Income allows you to look at your previously paid bills and when you marked them as paid. Besides the date, you can also look at the amount and your payment method. This is a useful tool, especially for seeing when you tend to pay bills. You can also use this page to review when you received income. Use the Search All Visible Columns feature if you need to find a particular past payment. You can also sort your payments by any of the columns on the page.
Do you know how to access and add Tags?
Often, people add tags only when they are looking at an individual transaction, but you can also add tags using the Tags screen. To access the Tags screen, you can press Shift+Command+T, or you can find it under the Window menu. From the Tags screen you can use the + to add tags. This is useful if you want to add a series of tags, such as transaction tags set up for a particular person or purpose. When you add a Tag, be sure to take advantage of the description field. Sometimes people forget why they tagged something, and having a description of the Tag is handy.
Do you know about Transactions Reports?
When you look at your register in Quicken, you can see a lot of information about your transactions, but reports allow you to dig deeper. You can use your Transactions reports to get more information about your transactions. There are five transactions reports:
- Transactions by Account
- Transactions by Category
- Transactions by Month
- Transactions by Payee
- Transactions by Tag
The Transactions reports not only list your transactions, but can give you summary information. To see your summary information, select Summary as your report Type in the menu at the top of your report, then select the criteria for your summary.
Using the Payees & Rules window
Did you know that you can view a list of your payees? You can access that list at Window → Payees & Rules or by using the Shift + Command + E shortcut. You can use Payees & Rules to set up Renaming Rules and Quickfill Rules your payees by choosing those options at the top of the screen. You can also edit a Payee to add a payment option such as Bank Bill Pay, Check Pay, and eBill. To edit a Payee, double-click the Payee in the list.
Did you know that many charts and reports are interactive?
If you click on a segment of a chart, it will provide more information. For example, if you are looking at your Spending by Category chart and select one of the segments, it will take you to the spending for the category it corresponds to. If you are using our Budget feature and select a category, an informational window appears, and you have the option to view your transactions in that category.
Do you know how to review your alerts?
Select Alerts to view any items that Quicken has flagged for you to look at. You can find Alerts on the Quicken for Mac top menu. The Alerts section will display your latest alerts, as well as when you lasted synced your accounts. Click the gear icon to choose what alerts to receive and how you will receive them. Some alerts can be sent as an email, and Failed Payment alerts can be sent as a text message.
Expanding and collapsing sections of a report
Did you know that you can print reports with expanded or collapsed sections? Once you have selected a report, you can use Table Options to Expand All or Collapse All sections. For individual sections of the report, use  to expand a section and
  to collapse a section. If you’re using a transaction report, you’ll also find the Columns option lets you change your columns. When you use Print, the report will print the way it displays on the screen.
Review your transactions as a calendar
Did you know you can access your transactions as a calendar rather than a list? The Calendar view can be very helpful in putting your spending in perspective. This will help you determine when transactions occur, both as a day of the month and a day of the week.
In Quicken for Windows, press CTRL+K to see your Calendar. You can also access it by selecting Calendar from the Tools menu.
In Quicken for the Mac, Calendars appears as a tab on the Quicken Feature Bar.
View and edit your account details
Did you know you can easily view your account details and settings. This allows you to make adjustments to things such as your Account Name and Account Description. You can also take actions such as hiding or closing an account.
To edit account details in Quicken for Windows, right-click the account you want to edit on the account bar and select Edit/Delete Account.
To edit account information in Quicken for the Mac, CTRL+Click on the account you want to edit on the account bar and select Edit [account] Settings.
Get a report on your cash flow
Quicken has many reports you can run to help you track and understand your finances. One useful report is the Cash Flow Report. Cash flow is a summary of the amount of money going into and coming out of your accounts. The Cash Flow Report provides information about your inflows (income or other money going into your accounts) and outflows (money that was spent or otherwise left your accounts). It is broken down by Category and the default a yearly summary. It can be helpful to see how much money is being spent cumulatively in a given category.
To view the Cash Flow Report in Quicken for the Mac, select Reports > Popular > Cash Flow.
Use your Dropbox account
When you set up your Quicken subscription, one benefit you get is free cloud storage with Dropbox. Dropbox is an online service that can be used to store your Quicken backup files. It creates a folder you can access from your computer that takes anything you store in it and backs it up in online cloud storage. Quicken encourages you to use Dropbox to store a backup your Quicken data file, but Dropbox can be used to store any files you want to keep safe and be able access from multiple computers. For more information, please read our Dropbox FAQ.
It is a good idea to regularly save a backup of your Quicken data file. Having a backup of your data file (also called a dataset) allows you to recover your information if your data file becomes corrupted or you encounter other issues.
To save a backup of your data file in Quicken for Windows, go to File > Backup & Restore > Back up Quicken file (you can also use the keyboard shortcut CTRL+B). If you have set up your Dropbox account, use Change to navigate to Dropbox and save your file.
To save a backup of your data file in Quicken for the Mac, go to File > Save a backup. If you have set up your Dropbox account, use Where to navigate to Dropbox and save your file.
Review your Memo field to find more information about a transaction
When you view your register, the Memo field is packed with information. Often, the Memo field will include a date, especially for a card transaction. This date can be useful for tracking when a transaction occurred. The Date field in your register lists the date money moved into or out of your account. The Memo field date is from when the payee entered the payment request. This is usually the date of the transaction. Other common features in the memo field are addresses and payment methods.
Getting the latest transactions is as easy as OSU
Did you know you use One Step Update (OSU) to add the latest transactions from your bank into Quicken? OSU contacts all of your financial institutions and gets the latest transactions. If you are using Quicken for the Web or Quicken Mobile, it also syncs your transactions with those Quicken versions. Be sure to use OSU before and after every session.
How to search all of your transactions

You can use the search feature to find transactions for a specific amount, payee, category, tag, memo, date, check number, or any other column that is visible in your register. For the most effective search, select All Transactions from the Account Bar. Use the search field on the right side of the screen to search for transactions. Remember that the search will only review the columns that appear on your register.
Did you know Quicken for Mac starts where you left off?
When you finish a session in Quicken for Mac, the program remembers what page you were using, whether it was the register, a budget page, a spending page, or even a report. Whatever page you were on when you closed Quicken will be the first page you see when you open Quicken the next time.
Use Import to get more than 90 days of transactions
Did you know that Quicken can only access your most recent 90 days of transactions from your financial institution (FI) when you add an account?
Some FIs support downloading transactions that can be imported into Quicken. You can use that option to import past transactions into Quicken. Users often want to have at least the current year’s transactions to start with. You can find the list of FIs that support downloading transactions into Quicken on the support site.
Make more room by collapsing your account bar

Sometimes it can be hard to fit all the financial data you want on a single screen, especially if you are working from a laptop computer. To help with this, Quicken for Mac provides you with a way to collapse your account bar. To collapse or expand the account bar, select the  on the top of the account bar. To expand the account bar, select
  on top of the account bar.
Do you love keyboard shortcuts?
Keyboard shortcuts make navigating through Quicken faster and easier. We have many keyboard shortcuts that can help you get straight to where you need to go. Here are some popular shortcuts. For a full list, look up Keyboard Shortcuts in the help.
| Action | Keyboard Shortcut |
|---|---|
| Quicken Preferences | ⌘, |
| Page setup | ⇧⌘P |
| Minimize Quicken window | ⌘M |
| Hide Quicken | ⌘H |
| Update all online accounts | ⇧⌘U |
| Update selected online account | ⌘U |
| Sync to mobile | ⌃S |
| New transaction | ⌘N |
| Edit transaction | ⌘E |
| Mark as paid | ⌘R |
| Mark as reviewed | ⌥R |
Add or Remove Columns from your Register
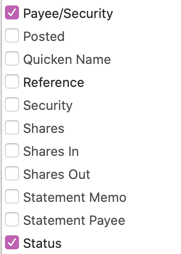
When you start using Quicken for Mac, your register comes with a set of default columns such as Date, Payee/Security, and Category. Did you know that there are actually many columns to choose from? To see a list of columns, right-click on any column heading to bring up the columns list. Some popular columns you may want to consider adding are: Memo, Tags, Check #, and and Type. You can use the same feature to remove columns you don’t needs to see. Remember that when you search your register, the search only reviews the columns that appear on your register. If you choose to hide a column, the information in that column will not appear in your searches.
Did you know you can quickly find matching transactions?

Have you ever looked at a transaction in your register and wanted to see other transactions from the same payee or in the same category? There’s a quick way to do that. Just right-click on the transaction. You’ll see a list of options, including the option to find the payee or the category. Select either of those and the register will list just the matching transactions.
Did you know you can bulk edit transactions in the register?
Do you ever need to update a lot of transactions at once? Maybe you’d like to change the category for a group of transactions? Or maybe quickly add the same tag or note to a group of related items? This is actually very easy!
First, find the transactions you want to change. For example, if you want to update the category for a given payee, you could first sort by Payee and then multi-select all the transactions with that payee name. (Tip: choose the “Banking” item in the account first to get transactions from multiple accounts).
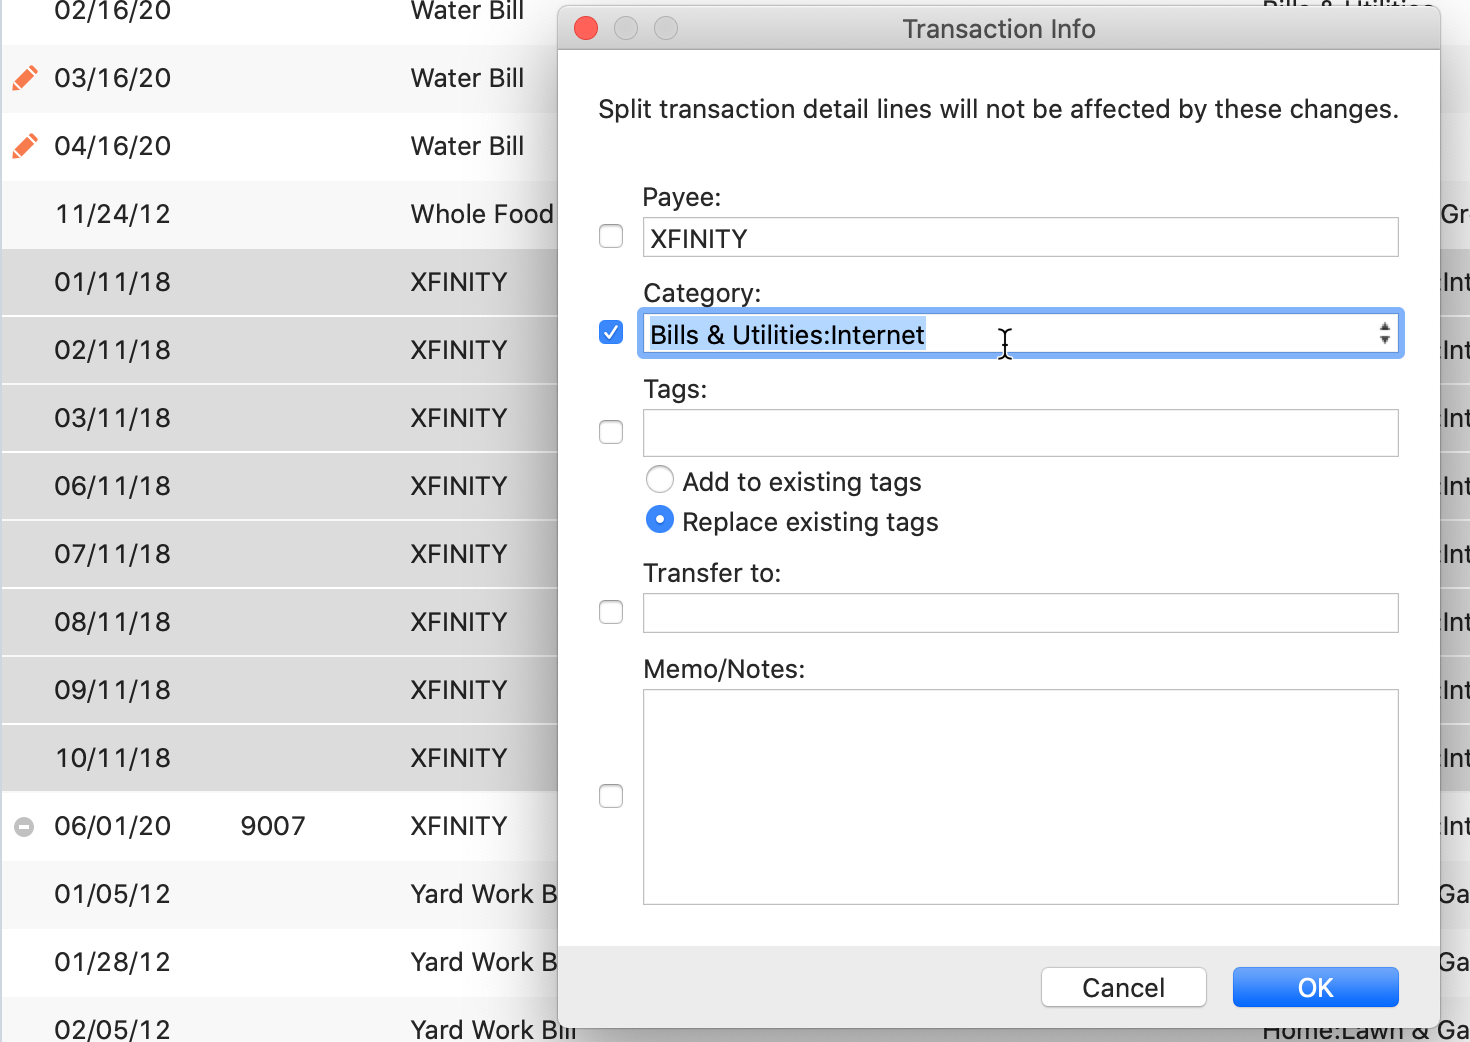
To multi-select a group of transactions select the first transaction in the range, then hold down Shift and select the last transaction in the range.
Once you have selected the transactions, choose Transaction > Edit Transaction from the menu (or just type ⌘E). This will bring up the multi-edit window. Here you can edit the Payee, Category, Tag, Transfer account or Note. The change will be applied to all the selected transactions! Click OK to make the change.
Quicken has made the material on this blog available for informational purposes only. Use of this website constitutes agreement to our Terms of Use and Privacy Policy. Quicken does not offer advisory or brokerage services, does not recommend the purchase or sale of any particular securities or other investments, and does not offer tax advice. For any such advice, please consult a professional.
About the Author
John Hewitt
John Hewitt is a Content Strategist for Quicken. He has many years of experience writing about personal finance and payment processing. In his spare time, he writes stories and poetry.
