Quicken Classic for Windows — Tips & Tricks
Quicken is a powerful personal finance tool with a wealth of features. To help you find new ways to use and improve your Quicken experience, we’ve assembled a number of tips. You’ll find tips here for both beginners and power users. The more you know, the better your Quicken experience will be.
How to use your Portfolio Value report to help with tax loss harvesting
Tax loss harvesting is a strategy used to reduce tax liability by selling investments that have lost value to offset taxable gains. If you do this and track your investments in Quicken, you can get the information you need to calculate your losses using the Portfolio Value report. Simply run the Portfolio Value report and click the Show Lots button at the top of the report. Then, sort the Gain/Loss field to see your tax loss harvesting opportunities.
Track your investments with the Income by Security report
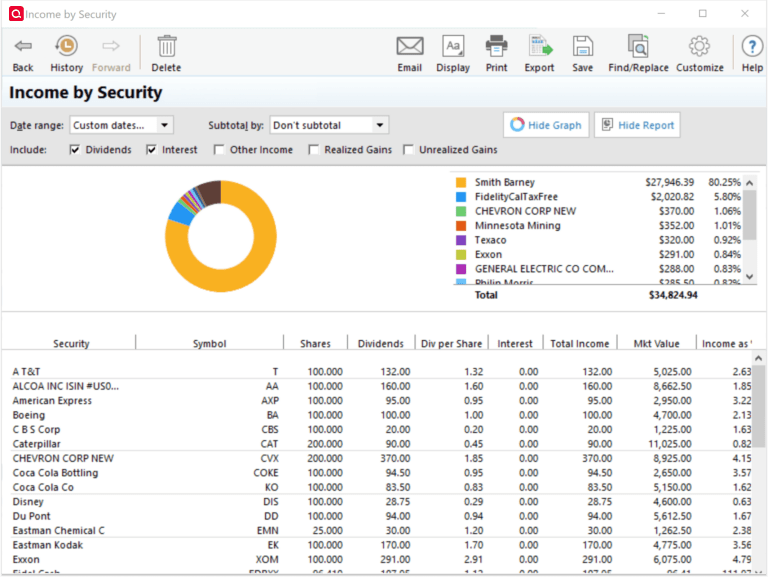
Stay on top of your investments with the new Income by Security report! This detailed report offers an overview of dividends, interest, and realized or unrealized gains by security all in one report.
To access the report, navigate to Reports -> Investments -> Income by Security. The report includes columns such as Security, Symbol, Shares, Dividends, Interest, Other Income, Realized Gains, and more. Check out this report today to track your investment income and gain valuable insights into your portfolio.
Manually edit bill reminders
Quicken makes it easy to edit the details of your bill, income, and transfer reminders. All you need to do is go to your Bills & Income tab and select the down-arrow button on the right side of the reminder. You can then choose Edit this instance or Edit this instance and all future instances.
You can edit everything from the bill details, such as the biller and the amount due, to the tracking information, such as categories (including splits), tags, and memos.
You can see security names and symbols in your investment register
Did you know that in addition to security names, you can also view security symbols in the investment register? To see the security symbol with the name, go to the gear icon ![]() in your investment register and select Security Display in Register → Symbol/Security. The Security column will display the symbol first, followed by a colon and the security name. For example, SPAXX: FIDELITY GOVERNMENT MONEY MARKET.
in your investment register and select Security Display in Register → Symbol/Security. The Security column will display the symbol first, followed by a colon and the security name. For example, SPAXX: FIDELITY GOVERNMENT MONEY MARKET.
You can schedule reminders by the number of days
Many bills are due on the same day every month, and most paychecks are on a bi-weekly or monthly schedule. However, some employers and billers have payment or billing cycles based on a fixed number of days, such as every 30 days. This sort of schedule can cause mismatches in the calendar. To help you with this issue, we have added the ability to schedule reminders by the number of days. To schedule a bill, go to the Bills & Income tab and click the ![]() icon on the upper-right part of the screen. Select Manual Bill. When setting up your reminder, click Change next to the date and then choose Daily as the frequency.
icon on the upper-right part of the screen. Select Manual Bill. When setting up your reminder, click Change next to the date and then choose Daily as the frequency.
You can hide accounts you track but don’t want to see every day
Quicken gives you the ability to hide accounts. Hiding an account allows you to continually track the account but not have it clutter up your sidebar. For less-used accounts, or if you track many accounts, hiding an account can be handy.
To hide an account, go to the Tools menu and choose Manage Hidden Accounts. From there, choose the Hide in Account Bar and Account List checkbox next to the account(s) you want to hide. This will hide the account in the Quicken sidebar and transaction lists, such as when creating a transfer. However, all data from the hidden account will still be available by default in the budget, reports, net worth, and other features.
If you’d like to exclude all an account’s transactions from reports and features by default, choose the Keep this Account Separate option. Keep this Account Separate is helpful if you manage an account for a relative, club, etc.
Get your credit score
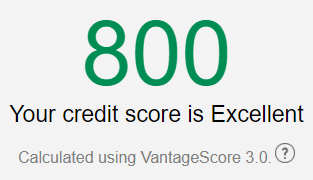
Did you know that Quicken will show you your credit score for free? At the bottom of the account bar, you can see Credit Score. Click on Credit Score, and you will be prompted to enter your social security number. You will also be asked some other questions about your credit history. These are to verify you are who you say you are. Quicken does not store this information. When you’ve finished, you’ll see a summary of your credit report, including your credit score.
Have you added your student loans?
If you have student loans, it’s important to know how much you owe. Quicken works with many student loan providers so you can download and track your loan information automatically. Providers on Quicken include Navient, American Education Services (AES), CornerStone, PHEAA, SoFi, MOHELA, and many others. To add a student loan provider, follow the same process for adding accounts and choose the provider you work with. Be aware that while you can track the balance of your connected loans, the many payoff options for student loans mean you cannot track amortization or some of the other features available for mortgages and other loans.
Get more information about currencies
Do you need to know the exchange rate for the U.S. dollar versus other currencies? You can quickly pull up a list using Ctrl+Q or going to the Tools menu and selecting Currency List. The Currency List provides the exchange rate and symbol for over thirty major world currencies. Be sure to click the Update button on the Currency List screen to get the latest exchange rates.
Update your information from the Quicken Dashboard

When you use the Quicken Dashboard, you may notice that you can now see when your transactions were last updated listed at the top of the dashboard. Next to that, you’ll see the Update now feature. Clicking Update now will activate One Step Update, which is also available on the accounts toolbar. Use Update now as a convenient way to update your transactions and see your latest transaction information.
Did you know Quicken has a Deduction Finder?
If you are looking to reduce your taxes, Quicken’s Deduction Finder lets you select from over 100 deductions to find out if you are likely to qualify for that deduction. To try Deduction Finder go to Planning menu → Deduction Finder.
Did you know you can specify which accounts to sync with mobile & web?
While you can track many financial accounts in Quicken, you may not want to see all of those accounts when you are using the companion software, Quicken Mobile and Quicken on the Web. You can easily specify the accounts to sync by navigating to the Mobile & Web tab, selecting the gear icon ![]() , and clicking Account Settings.
, and clicking Account Settings.
You can also designate which accounts to sync by going to Edit menu → Preferences → Mobile & Web. Under Accounts, you will see a link that tells you how many of your accounts are enabled (will sync). Click that link to select what accounts to sync with your mobile and web accounts.
Three things you should do in Quicken at the end of the year
One: Back up your file
It’s a good idea to back up your transactions at the end of the year. This ensures that you will have a backup copy that includes that year’s finances.
To begin the process go to File menu → Copy or Backup File and select Create a complete backup. You might want to save your backup to Dropbox or another cloud backup location. You should also go to Edit menu → Preferences → and select Backup. Make sure you have automatic backups turned on.
Two: Run year-end reports
Run reports to see your past year’s finances. Almost all reports are useful from a year-end perspective, but here are five great reports to run:
Tax Summary: A tax perspective on your income and expenses. Depending on your tax situation, you may want to run several of the tax reports.
Banking Summary: An overall view of your income and expenses by category.
Transaction: A complete list of all your transactions.
Spending by Payee: A comprehensive list of who you paid money to.
Cash Flow Comparison: Compare your spending to previous years.
Three: Review your budget and categories
The end of the year is a great time to review your budget and the categories in it. Look for areas where you overspent or underspent. Also, check to be sure your transactions are properly categorized. You may find that some transactions are better tracked by a different category once you take the time to give them a second look.
Track Bills, Income & Transfers together
Would you like to see all of your scheduled/upcoming transactions in one place? The default in Quicken is to have Bills on a separate tab from Income & Transfers. Both are located under Bills & Income. If you’d rather see all three transaction types on these tabs, go to Edit menu → Preferences. Under Navigation, select Combine Bills, Income, & Transfers and then select OK. Both tabs will now be combined.
You can choose between the Classic Dashboard and Modern Dashboard
There are now two dashboard options for your Home tab. The Classic Dashboard is the default for existing users while the Modern Dashboard is now the default for new users. Both views are useful, but the new Modern Dashboard is easier to read and will continue to be improved as we move forward. To see the Modern Dashboard, click the main Home tab then click Dashboard. If you do not see the Modern Dashboard, select the Gear icon at the top right of the dashboard view and click the Classic Dashboard switch.
Add reminders quickly and easily
You can quickly add Income, Transfer, and Payment reminders. In the Classic Menu, just go to Bills → Add Reminder, and choose the type of reminder you want. You can also use CTRL+J to go to your Bill and Income Reminders screen and select the Add menu. Be prepared to enter or select the Payee, Amount, Account, and Date.
Another way to quickly add reminders is to select an existing transaction in the register, then right-click and select Add Reminder to create a reminder based on that transaction.
Get more information about your last account update
Do you want to see what was updated the last time you performed a One Step Update? Go to Tools menu → One Step Update Summary. You’ll see what accounts were updated, how many new transactions (if any) were added, and what the date of the last update was.
See all your securities in one place
Did you know that if you use Quicken’s investing features, you can quickly bring up a list of your securities? You can access your Security List by going to Tools menu → Security List or pressing Ctrl + Y. From the list, you can see what securities you are tracking, edit or delete those securities, and add new securities.
Get your projected balance
Did you know Quicken can forecast what your bank balance will be? Go to Bills & Income, then select Projected Balances. You can look at the projected balance for all of your accounts or choose a single account. You can also choose from different date ranges. To take full advantage of this feature, you should also be using future dated transactions and bill scheduling.
Set savings goals
Quicken can help you set savings goals so you can plan for your future. Just go to the Planning, and select Savings Goals. Select Get Started and enter the Goal name, Goal amount, and Finish date.
Access the Tag List
Did you know you can access the Tag List to review all your tags? You can use Ctrl + L or go to Tag List on the Tools menu. You can use the Tag List to view your current tags. You can also use the New Tag button to add additional tags. The Tag List also has a search feature, which is handy if you use a lot of tags.
Remind yourself when paychecks are coming
Did you know you can add a reminder to let you know when your paycheck is coming? This is a great way to help you get more information about your cash flow. To add a paycheck reminder, go to Bills → Add Reminder → Paycheck Reminder.
You can use filters to easily navigate your register
Did you know you can use the filters on top of register to view specific transactions, such as uncategorized transactions or deposits? From the register you can filter by time span, type, or status (such as Uncategorized, Unreconciled, or Flagged. If you are using All Transactions, you can also filter by a specific account. If none of those filters work for you, you can use the powerful search tool next to the filter. Enter any term or number and the search will list only the transactions that match.

You can find lost data files quickly
Did you forget where you saved your data file? You can find all the Quicken data files on your computer by selecting Find Quicken Files from your File menu. A screen will appear with all your Quicken files, including backup files. It may take your computer some time to search all of your directories.
Check for product updates
If you want to check to see if you are on the latest version of Quicken, go to Help → Check for updates. It will let you know if you are on the most current software version. If you aren’t on the latest version, you can update right from that screen.
Use Net Worth to see a graph of your assets and liabilities over time
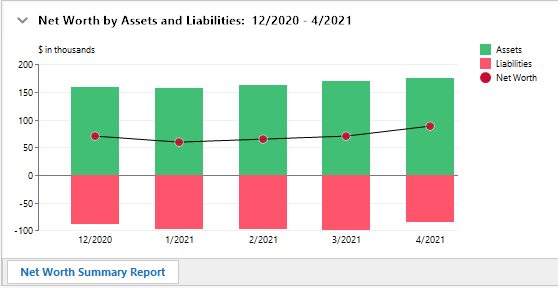
When you look at the Accounts bar, you will see your Net Worth listed near the bottom of the bar. This amount is the sum of your assets and liabilities. You can select Net Worth to get more information about your financial worth. This includes graphs such as Net Worth by Assets and Liabilities. This graph will show you how your assets and liabilities have changed over time.
You can recategorize a group of transactions, payees, bills, or deposits
Did you ever regularly assign transactions to one category, only to realize there was a better category? You can use Recategorize to change categories for a large group of transactions, payees, bills, or deposits. Go to Tools → Recategorize. Then use the Find feature to find items within a particular category. You can choose from:
- Transactions
- Memorized payees
- Scheduled bills and deposits
Select the category and you can find the items using that category. Select the items you want to change, then the category you want to assign them to.
Did you know Quicken comes with a calculator?
Do you need to do some quick math? You can do it without leaving the Quicken application. Go to your Tools menu and select Calculator. You’ll see a simple, easy-to-use calculator. You can enter numbers using the buttons on the calculator or your keyboard. You can even paste in a number using the big Paste button.
Do you know about EasyAnswer?
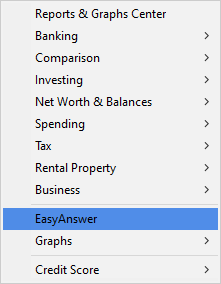
Sometimes it’s difficult to figure out which report will give you the information you need. EasyAnswer, located on your Reports menu, helps you by presenting reports identified by the question they answer. You can answer questions such as:
- How much money did I spend on …?
- Am I saving more or less?
- What am I worth?
- Did I meet my budget?
- How are my investments performing?
If necessary, the report then walks you through the options you need to get your information. You’ll also get to see the name of the report that tells you what you need to know, so that you can go there directly in the future.
Did you know Quicken can find your data files for you?

Have you ever forgotten where your data file is saved? To get help with this, go to your File menu. You can find all of the data files stored on your computer using Find Quicken Files. You can also identify the location of your current Quicken data file by selecting Show this file on my computer. It will take a minute or two to scan your computer, but Quicken will find everything for you.
Do you know about the Transactions Report?
When you look at your register in Quicken, you can see a lot of information about your transactions, but you can also use your Transactions report to get more information about your transactions. The Transactions report will not only list your transactions for a selected time period, but it also gives you summary information such as Total Inflows, (The total amount of money added to your accounts) and Total Outflows (The total amount of money subtracted from your accounts). You can also set up Subtotals, which is a great way to look at your weekly, monthly, or other periodic spending. The Transactions report can be accessed at Reports → Banking.
Using the Memorized Payee List
Did you know that Quicken automatically saves a list of your payees. You can access that list at Tools → Memorized Payee List or by using the Ctrl + T shortcut. You can use this list to set up your payees with the information you want to appear every time there is a transaction, such as a default Category, Tag or Memo. You can also lock a Payee, which means that even if you edit the payee in an individual transaction in your register, it will not change your memorized information for that Payee. To edit a Memorized Payee, select the payee in the list and choose Edit.
Did you know that many charts and reports are interactive?
If you click on a segment of a chart, it will provide more information. For example, if you are looking at your Spending chart and select one of the segments, it will take you to the spending for the category it corresponds to. If you are using our Budget feature and click on a category, it brings up a window that allows you to view your pending history or your transactions that month.
Do you know about the Tag List?
Do you like to tag your transactions? Tags are an excellent way of adding extra information about transactions that go beyond the information in Categories. For example, if several expenses are going to a single event, such as an upcoming wedding, you could use a Wedding tag to mark all of those expenses. Unlike categories, Tags are completely up to you. There are no pre-set tags.
The Tag List is where you can go to see all of the tags you are currently using. You can also add new tags. To view the Tag List, select Tools > Tag List, or use Ctrl + L.
Customize your Register Columns
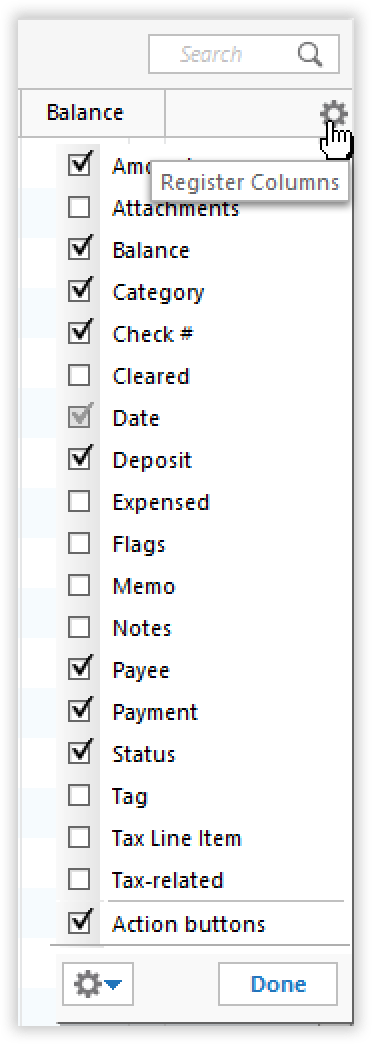
Do you ever look at your transactions register and see columns you don’t need or want or even understand? Is there information that you wish you could see in your register but it doesn’t have a column? Good news! The register is customizable. You can add the information you need and remove the clutter you don’t want to see.
To customize what columns you see in your register, click the gear icon on the right side of your register. You’ll see a list of columns, some of which are selected, and some are not. While there are certain columns you probably can’t do without, such as Amount or Payee, there are many columns that are more helpful to some users than to others. Click the checkbox nest to a column name to either add or remove that column from your register. The information is still being tracked, of course. You simply have the option of whether or not you see it in the register. If you never use Tags or add Attachments, for example, you can deselect those columns so you don’t have to see them in your register. On the flip side, if it is important to you to see if individual transactions are Tax-related or Expensed, select those columns.
Having just the columns you need in your register can make for a cleaner look that is easier to review and keep up to date.
Review your transactions as a calendar
Did you know you can access your transactions as a calendar rather than a list? The Calendar view can be very helpful in putting your spending in perspective. This will help you determine when transactions occur, both as a day of the month and a day of the week.
In Quicken for Windows, press CTRL+K to see your Calendar. You can also access it by selecting Calendar from the Tools menu.
In Quicken for the Mac, Calendars appears as a tab on the Quicken Feature Bar.
View and edit your account details
Did you know you can easily view your account details and settings. This allows you to make adjustments to things such as your Account Name and Account Description. You can also take actions such as hiding or closing an account.
To edit account details in Quicken for Windows, right-click the account you want to edit on the account bar and select Edit/Delete Account.
To edit account information in Quicken for the Mac, CTRL+Click on the account you want to edit on the account bar and select Edit [account] Settings.
Get a report on your cash flow
Quicken has many reports you can run to help you track and understand your finances. One useful report is the Cash Flow Report. Cash flow is a summary of the amount of money going into and coming out of your accounts. The Cash Flow Report provides information about your inflows (income or other money going into your accounts) and outflows (money that was spent or otherwise left your accounts). It is broken down by Category and the default a yearly summary. It can be helpful to see how much money is being spent cumulatively in a given category.
To view the Cash Flow Report in Quicken for Windows, select Reports > Banking > Cash Flow.
Use your Dropbox account
When you set up your Quicken subscription, one benefit you get is free cloud storage with Dropbox. Dropbox is an online service that can be used to store your Quicken backup files. It creates a folder you can access from your computer that takes anything you store in it and backs it up in online cloud storage. Quicken encourages you to use Dropbox to store a backup your Quicken data file, but Dropbox can be used to store any files you want to keep safe and be able access from multiple computers. For more information, please read our Dropbox FAQ.
It is a good idea to regularly save a backup of your Quicken data file. Having a backup of your data file (also called a dataset) allows you to recover your information if your data file becomes corrupted or you encounter other issues.
To save a backup of your data file in Quicken for Windows, go to File > Backup & Restore > Back up Quicken file (you can also use the keyboard shortcut CTRL+B). If you have set up your Dropbox account, use Change to navigate to Dropbox and save your file.
To save a backup of your data file in Quicken for the Mac, go to File > Save a backup. If you have set up your Dropbox account, use Where to navigate to Dropbox and save your file.
Review your Memo field to find more information about a transaction
When you view your register, the Memo field is packed with information. Often, the Memo field will include a date, especially for a card transaction. This date can be useful for tracking when a transaction occurred. The Date field in your register lists the date money moved into or out of your account. The Memo field date is from when the payee entered the payment request. This is usually the date of the transaction. Other common features in the memo field are addresses and payment methods.
Getting the latest transactions is as easy as OSU

Did you know you use One Step Update (OSU) to add the latest transactions from your bank into Quicken? OSU contacts all of your financial institutions and gets the latest transactions. If you are using Quicken for the Web or Quicken Mobile, it also syncs your transactions with those Quicken versions. Be sure to use OSU before and after every session.
Global Search makes finding transactions easy

Did you know you can use theGlobal Search on the Title Bar to find transactions for a specific amount, payee, category, tag, memo, date, or check number? The global search finds information across all of your accounts.
How to get Quicken to start on a specific page
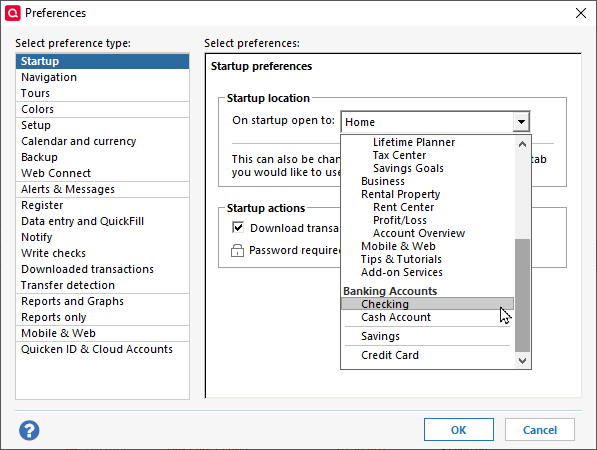
The Home page in Quicken is useful and easy to customize, but you don’t have to start at the home page. If there is a page you use the most in Quicken, or one you want to automatically check every time you start up the program, you can make that your default startup page. To do that, you just need to select that page in the Preferences.
Remember, you can get to Preferences by selecting Edit → Preferences. From there, choose Startup. Select the appropriate screen under Startup location.
The next time you launch Quicken, the page you select will be your new default startup page.
Another thing you can do on the Startup preferences page is set Quicken to automatically Download transactions on startup. This can save you a step when you first launch Quicken.
Use import to get more than 90 days of transactions
Did you know that Quicken can only access your most recent 90 days of transactions from your financial institution (FI) when you add an account?
Some FIs support downloading transactions that can be imported into Quicken. You can use that option to import past transactions into Quicken. Users often want to have at least the current year’s transactions to start with. You can find the list of FIs that support downloading transactions into Quicken on the support site.
Moving your account bar
You can use Navigation preferences to customize your Quicken experience. Your account bar, for example, normally appears on the far left side of your screen. You can use the Navigation preferences to move the account bar to the right side of your screen.

Navigation preferences also control other parts of your Quicken experience such as whether to use Classic menus or to display the Quicken toolbar.
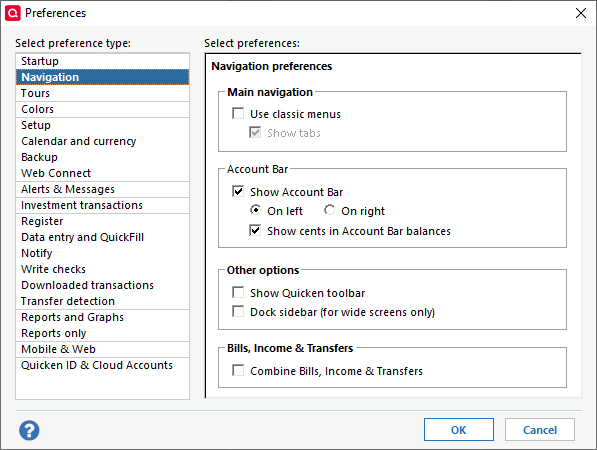
Remember, you can get to your preferences by selecting Edit → Preferences. From there, choose Navigation.
Do you love keyboard shortcuts?
Keyboard shortcuts make navigating through Quicken faster and easier. We have many keyboard shortcuts that can help you get straight to where you need to go. Here are some popular shortcuts. For a full list, look up Keyboard Shortcuts in the help.
| Action | Keyboard Shortcut |
|---|---|
| Toggle between standard and full screen | F11 |
| Select an item in a list | First letter of item, then press DOWN ARROW as needed |
| CTRL+P | |
| Go to the Home tab | ALT+Home |
| Go to the Write Checks screen | CTRL+W |
| Go to the Calendar | CTRL+K |
| Go to the Account List | CTRL+A |
| Go to the Category List | CTRL+SHIFT+C |
| Go to the Tag List | CTRL+L |
| Go to the Bill & Income Reminders dialog | CTRL+J |
| Go to the Manage Hidden Accounts dialog | CTRL+SHIFT+M |
| Go to the Memorized Payee List | CTRL+T |
How to change colors in Quicken
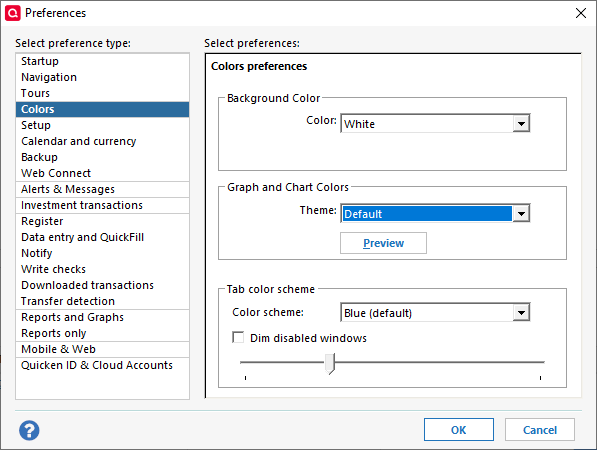
Are the regular colors of Quicken giving you the blues? You can change those colors, just select Colors under preferences. From there you can change the color of the background, the charts and graphs, and the tabs.

Remember, you can get to your preferences by selecting Edit → Preferences. From there, choose Colors.
Do you prefer wide or narrow register rows?
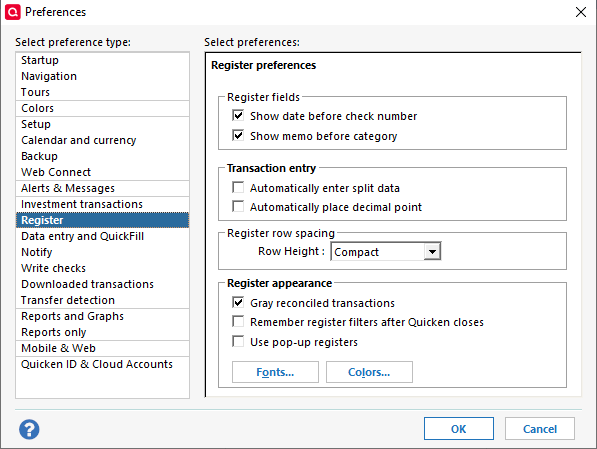
When you are viewing transactions in the register, do you find yourself wishing that the entries had more space so you could easily read the text. On the flip side, would you rather have shorter rows so that you can see more entries? Quicken gives you a choice between comfortable, standard, and compact row heights. Here is a quick look at the difference:

Remember, you can get to your preferences by selecting Edit → Preferences. From there, choose Register, then Row Height.
Add or remove columns from your register
When you start using Quicken for Windows, your register comes with a set of default columns such as Date, Payee, and Category. Did you know that there are actually many columns to choose from? To see a list of columns, click the gear icon located on the far-right side of the column header above the scroll bar. Use this to turn on columns you’d like to see, like Memo or Tag, or turn off columns you don’t need. You can even use this control to set your column preferences for all your accounts with one click.
See two lines of information in your register
Did you know you can adjust your register to show a two line display? The Register normally displays a single line of information, which is sufficient in most cases but sometimes there is more information to see. You may find that a two-line display gives you a better view of your information. to make this change

To switch between one-line and two-line display in your register, press CTRL+2.
Make a backup of your data file regularly
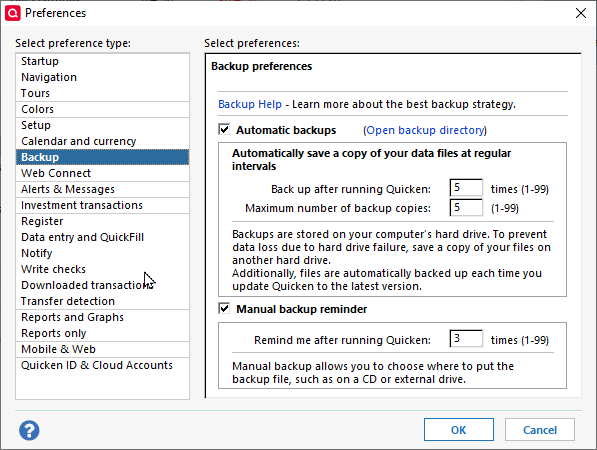
Just like all programs that store key data, the safest and smartest thing you can do is to make sure you have a backup of your file. To make a backup of your data file, press CTRL+B. You can also find the option on your File menu.
If you want to set up periodic backups, go to Edit → Preferences. From there, choose Backup. You can set Quicken to automatically make the backup or to give you reminders to perform the backup yourself.
Quickly find matching transactions
Have you ever looked at a transaction in your register and wanted to see other transactions from the same payee or in the same category? There’s a quick way to do that. Just right-click on the transaction in the column you want to search by. You’ll see a list of options, including the option to search based on that value.
| Right Click | Select |
|---|---|
| Payee | Payments made to [payee] |
| Category | Amount spent on [category] |
Quicken has made the material on this blog available for informational purposes only. Use of this website constitutes agreement to our Terms of Use and Privacy Policy. Quicken does not offer advisory or brokerage services, does not recommend the purchase or sale of any particular securities or other investments, and does not offer tax advice. For any such advice, please consult a professional.
About the Author
John Hewitt
John Hewitt is a Content Strategist for Quicken. He has many years of experience writing about personal finance and payment processing. In his spare time, he writes stories and poetry.
